

Advanced Mode User Guide
Web Page Functionalities
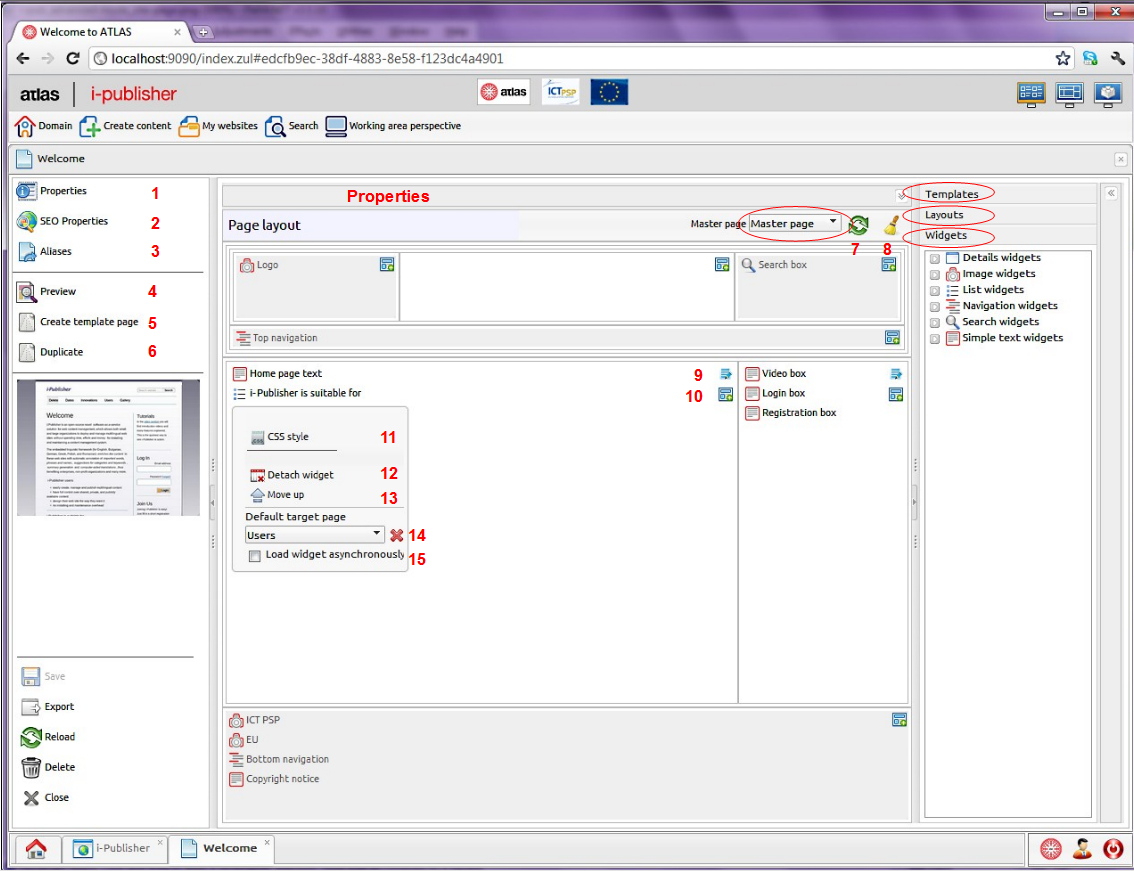
In the picture above you can see how the page editor looks like.
-
The first tab is the “Properties” tab (1). Here you can configure the general properties of the page (its name,description, etc.) and define its organization. To the right are the “Templates”, “Layouts” and “Widgets” stores (see the hints for more information on how to use them). The reload layout button(7) loads the last saved and the clean button(8) cleans the page layout. You can see the “Master page” dropdown menu where you can choose a master page for your page. The “Master page” dropdown would not be visible if there are no pages suitable to be masters. i.e. pages that have no master defined yet. The gray regions and widgets come from the master. When you click on a certain widget, its editor opens. On right-click, a menu appears that allows you to configure the page dependent properties of a certain widget (widgets can be reused in different pages and, thus, have different configurations in each page). You can:
-
apply certain CSS style to the widget component only (11);
-
detach the widget from the page(12);
-
move it up(13) or down within the widgets placed in the selected region;
-
define the target page for the widget(14);
-
choose whether the widget would be loaded asynchronously.
To edit region properties use the “Region properties” icon (9) in each region. The properties of the regions coming from the master page can be edited only through the master. The “Widget” icon (10) allows you to create new widgets in the selected region.
-
-
In the “The SEO properties” (2) tab you can define some advanced search engine optimization configuration.
-
The “Aliases” (3) tab lists all the aliases of the selected page.
-
Actions
-
“Preview” (4) - render the page. Create dummy content if necessary. Even the log-in-protected pages and widgets are displayed. Not very accurate when you have both log-in-protected and public-only widgets in one page.
-
“Create template page” (5) - create template page from the selected page. This template will be later listed in the “Templates” store.
-
“Duplicate” (6) – create new page by duplicating the selected one
-
ATLAS (Applied Technology for Language-Aided CMS) is a project funded by the European Commission under the CIP ICT Policy Support Programme.